Unity Development Environment Setup Guide
Issues with git credentials? Scene merging? Intellisense? Setting up the Unity Debugger? This guide should help you with all of that. It will not teach you how to use these tools, but rather how to set them up. I've spent days trying to figure out how to set up my environment properly, so hopefully this guide will save you some time.
Note that this was written while setting up a fresh PC for development. Some necessary steps might be missing or you might have already done some of the steps. Use this guide as a way of checking what you might have missed. Some things might also have changed since the writing of this guide (April of 2023).
- Install git: https://git-scm.com/downloads
- Install sourcetree: https://www.sourcetreeapp.com/ When installing, you will need to connect a bitbucket account. Create one if you don't have it. Afterwards, also connect your github account to Sourcetree.
- Install git credential manager (you might need to find newest release if link is outdated): https://github.com/git-ecosystem/git-credential-manager/releases/tag/v2.0.935
- Follow this guide to fix issue with GitCredentialHelper showing up over and over: https://community.atlassian.com/t5/Sourcetree-questions/I-always-get-a-popup-credential-helper-selector-asking-me-to/qaq-p/1465880
- Install Unity hub
- Install Unity version according to the project you are working on. A good way to do this is to try to open a cloned Unity project. Unity hub should then prompt you to install the correct Unity version for that project.
- No need to install Visual Studio when prompted, we will install VS Code later instead. Unlike Visual Studio, VSCode is completely free to use. Of course, you can use Visual Studio instead if you prefer.
- Setup unity smart merge to merge prefab and scene files automatically (it only takes 5 minutes!): https://docs.unity3d.com/Manual/SmartMerge.html
- Install VS Code (if you dont write any code at all you can skip VS code setup). This is a nice video which takes you through the next few steps: https://www.youtube.com/watch?v=ihVAKiJdd40 I also found this video for MAC (not tested at all though): https://www.youtube.com/watch?v=3GVGyooZ8jk
- At some point VS Code prompts to install Microsoft .Net SDK 7.0. Make sure it is installed if it didn't install automatically.
- VSCode extensions to install:
- C#
- Unity Tools
- Debugger for Unity (Included in Unity Tools, it will be shown as deprecated, but it still works). This extension helps with setting up the debugger for Unity.
- Git Lens - Git supercharged
- I also recommend these extensions:
- Github Copilot (it's free for students!)
- Bookmarks
- Code Spell Checker
- HLSL Tools (for writing shaders)
- Open your Unity project
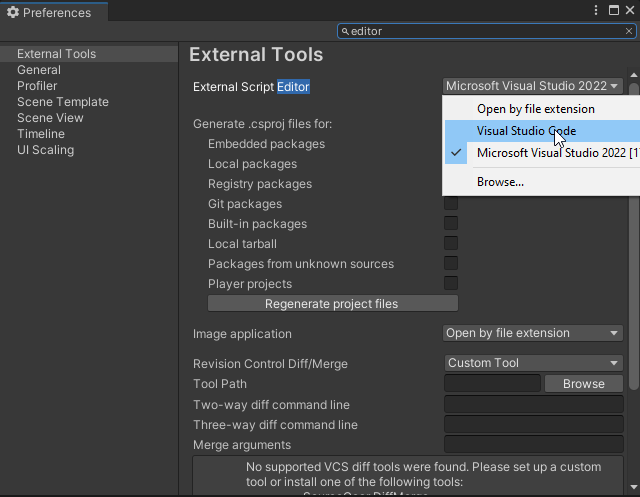
- Go to Edit > Preferences and search for "editor". Set default editor to VS Code.

- Setting up Debugging. Normally, installing the Debugger for Unity extension should be enough.
Switch to the debug tab on the left, and press create a launch.json file.
The dropdown menu that appears should contain the Unity Debugger. Sometimes it doesn't, in which case you need to give it some time :D
Try restarting VS Code and give it sometime to run in the background. For me, the button just appeared after doing so.
If it doesn't appear after 10-ish minutes, start searching for other solutions. This might help: https://answers.unity.com/questions/1815046/how-to-attach-unity-debugger-in-vs-code.html
 Pressing the button should create the file, and you should now be able to use debugging for your project.